Creating a Unity Discord Activity

Recently I was trying to set up a simple Discord activity that houses a Unity Game. The docs and tutorials I found were pretty sparse and often a bit outdated. After a bit of hair pulling, I was able to get things running. I wanted to share a very simple example in case anyone else struggled getting it going. Let's walk through how to do it.
On the surface, the architecture is pretty straightforward. You have a Unity WebGL build that is made available to the web. Discord then proxies that web URL into a sandboxed container in the app. Using the Discord API you can communicate between the web app, Unity build, and the Discord client.
There are three parts to setting up a basic Discord Unity activity.
- Building a small web application to host the activity.
- Setting up the Unity WebGL build
- Creating and configuring the activity in Discord
Setting up the Web Application
This tutorial assumes you have Node and NPM installed on your system. Let's start by scaffolding a web application using Vite.
When prompted, give it a name for your project. For simplicity, we'll choose the Vanilla template and basic Javascript.
npm create vite@latest
Go ahead and drop into the project directory and run npm install. While we are doing that, let's go ahead and install the Discord SDK tools, as we'll need them later.
cd unity-discord-example
npm install

npm install @discord/embedded-app-sdk
To test the activity from your local development environment, you will need a way to expose the app publicly. Discord recommends using the Cloudflared Tunnel Client. Follow the instructions at https://github.com/cloudflare/cloudflared to install the client on your development environment.
To make things easier, lets also add a NPM command to our config to automatically create the tunnel for us. In your package.json file, update the scripts block to add a tunnel command.
{
  ...,
  "scripts": {
    "dev": "vite",
    "build": "vite build",
    "preview": "vite preview",
    "tunnel": "cloudflared tunnel --url http://localhost:5173/"
  },
  ...
}
Setting & Configuring the Discord Activity
Log into Discord in a web browser. If you haven't already, go into your user settings and enable developer mode.
User Settings -> Advanced -> Developer Mode (toggle on)

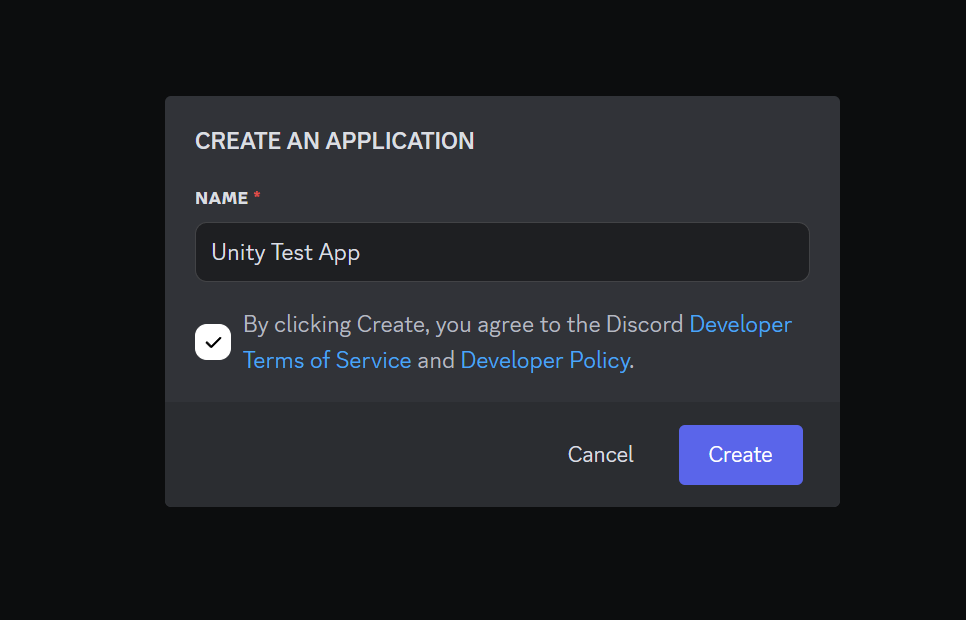
Next visit the discord developer portal at https://discord.com/developers/applications. You should see a button in the top right labeled "New Application". Click on that. Give your app a name and agree to the terms. Click create, solve the captcha, and you should then have a shiny new Discord app.
There is a lot of information, and settings inside the app configuration screens. For now, all that we need is the application ID that you'll find on the General Information screen. Lets go ahead and copy that.
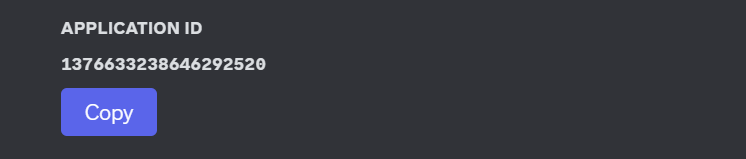
We can now add this to our project. Lets do that via an environment variable. Create a file in the root of your web project called .env and add the follow, substituting your application key.
VITE_DISCORD_CLIENT_ID=1376633238646292520Creating the Unity Build
This tutorial isn't going to go deep into any of the Unity Project setup. I'm going to assume you already have a Unity based game or app that can be exported as a WebGL build. For the purposes of this demo, I'm going to create a new project using the 2D Platformer Microgame learning templates.

Once the project loads, open the Build Profiles settings under File -> Build Profiles. Select Web from the platforms on the left and click the "Switch Platform" button at the top right. It will take a few minutes to update and recompile scripts.
(If you don't see web as an available platform, make sure your Unity install has the Web Build Support module installed.)
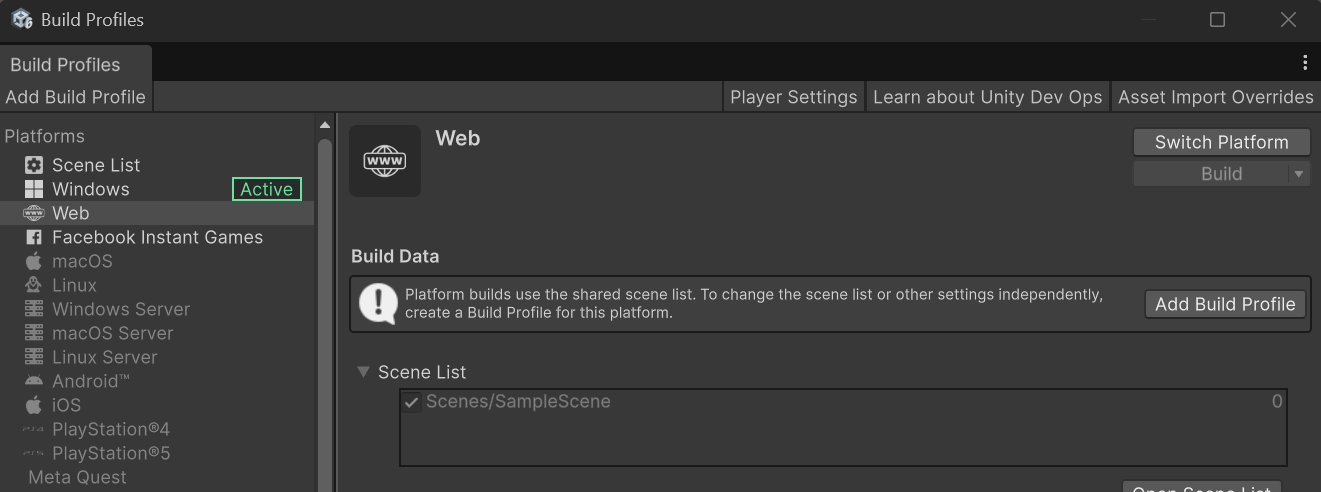
Once the platform switch has completed, click the Build button. It will prompt you to select a location for the project. It doesn't really matter where you put this as we'll be copying files from it into our project. To keep things simple, I'm going to create a folder called "build" in the root of our web project and unity save the build output there. When that's done you should see something like the following:

Updating the Web App to Serve the Unity Build
Now that we have a the Unity WebGL build ready, lets configure the web app to serve it.
Starting with the html, replace the contents of index.html with the following.
<!DOCTYPE html>
<html lang="en-us">
  <head>
    <meta charset="utf-8">
    <meta http-equiv="Content-Type" content="text/html; charset=utf-8">
    <title>Unity Discord Activity</title>
  </head>
  <body style="text-align: center; padding: 0; border: 0; margin: 0;">
    <div id="unity-container" class="unity-desktop">
      <canvas id="unity-canvas" width=960 height=600 scrolling="no" tabindex="-1"></canvas>
      <div id="unity-loading-bar">
        <div id="unity-logo"></div>
        <div id="unity-progress-bar-empty">
          <div id="unity-progress-bar-full"></div>
        </div>
      </div>
      <div id="unity-warning"> </div>
    </div>
    <script type="module" src="src/main.js"></script>
  </body>
</html>
This is a modified version of the index.html you'll find in your build folder. I've removed the mobile container, and we'll move all the Javascript into our main.js file. You can see that is included via script tag towards the bottom of the document. We'll also move the styles to a stylesheet to keep things clean.
From the location where you saved the build output from Unity, locate a folder named Build. It should contain four files that follow the pattern, where build_name is what you saved your Unity output as.
- build_name.data.gz
- build_name.framework.js.gz
- build_name.loader.js
- build_name.wasm.gz
Copy or move this entire folder into the public folder in the root of the web application.
From the location where you saved the build output from Unity, locate the folder named TemplateData. Copy or move that folder into the root of the web application.
It the web application open src/styles.css, remove all the contents, and replace it with the following.
body { padding: 0; margin: 0 }
#unity-container { position: absolute }
#unity-container.unity-desktop { height: 100vh; width: 100vw; overflow: hidden; }
#unity-canvas { background: #231F20;  height: 100vh !important; width: 100vw!important; }
#unity-loading-bar { position: absolute; left: 50%; top: 50%; transform: translate(-50%, -50%); display: none }
#unity-logo { width: 154px; height: 130px; background: url('../TemplateData/unity-logo-dark.png') no-repeat center }
#unity-progress-bar-empty { width: 141px; height: 18px; margin-top: 10px; margin-left: 6.5px; background: url('../TemplateData/progress-bar-empty-dark.png') no-repeat center }
#unity-progress-bar-full { width: 0%; height: 18px; margin-top: 10px; background: url('../TemplateData/progress-bar-full-dark.png') no-repeat center }
#unity-footer { position: relative }
.unity-mobile #unity-footer { display: none }
#unity-logo-title-footer { float:left; width: 102px; height: 38px; background: url('../TemplateData/unity-logo-title-footer.png') no-repeat center }
#unity-build-title { float: right; margin-right: 10px; line-height: 38px; font-family: arial; font-size: 18px }
#unity-fullscreen-button { cursor:pointer; float: right; width: 38px; height: 38px; background: url('../TemplateData/fullscreen-button.png') no-repeat center }
#unity-warning { position: absolute; left: 50%; top: 5%; transform: translate(-50%); background: white; padding: 10px; display: none }
What we've done here is copy the styles from the unity web build template with a few changes.
- All of the image URLs have been updated to reference our
TemplateDatafolder. - We've updated the styles on the container and canvas elements to force the unity app to take up the entire screen.
Now locate our main script file in src/main.js. Go ahead and remove everything except the line that imports the CSS file. Feel free to also delete counter.js and javscript.svg from the src directory. We will not need those.
Add the following to your main.js file after the css import line.
var canvas = document.querySelector("#unity-canvas");

function unityShowBanner(msg, type) {
  var warningBanner = document.querySelector("#unity-warning");
  function updateBannerVisibility() {
    warningBanner.style.display = warningBanner.children.length ? 'block' : 'none';
  }
  var div = document.createElement('div');
  div.innerHTML = msg;
  warningBanner.appendChild(div);
  if (type == 'error') div.style = 'background: red; padding: 10px;';
  else {
    if (type == 'warning') div.style = 'background: yellow; padding: 10px;';
    setTimeout(function() {
      warningBanner.removeChild(div);
      updateBannerVisibility();
    }, 5000);
  }
  updateBannerVisibility();
}

var buildUrl = "Build";
var loaderUrl = buildUrl + "/build.loader.js";
var config = {
  arguments: [],
  dataUrl: buildUrl + "/build.data.gz",
  frameworkUrl: buildUrl + "/build.framework.js.gz",
  codeUrl: buildUrl + "/build.wasm.gz",
  streamingAssetsUrl: "StreamingAssets",
  companyName: "DefaultCompany",
  productName: "Sample_Platformer",
  productVersion: "5.0.2",
  showBanner: unityShowBanner,
};

document.querySelector("#unity-loading-bar").style.display = "block";

var script = document.createElement("script");
script.src = loaderUrl;
script.onload = () => {
  createUnityInstance(canvas, config, (progress) => {
    document.querySelector("#unity-progress-bar-full").style.width = 100 * progress + "%";
        }).then((unityInstance) => {
          document.querySelector("#unity-loading-bar").style.display = "none";
        }).catch((message) => {
          alert(message);
        });
      };

document.body.appendChild(script);
This code again, comes from the Unity build template. If you look at the index.html file in the Unity build directory, you'll find this same code there. Once again, I've removed logic for mobile handling.
Now if you start the development server with npm run dev you should be able to play the game in the browser at http://localhost:5173/

Awesome! We've got a web app that serves up our game. We're almost ready to play it inside Discord!
Enabeling the app in Discord and Testing
Next lets create a tunnel to expose this app on a public URL that Discord can proxy for us. Open up another terminal, making sure to leave the dev server running, and run that tunnel command we created earlier. npm run tunnel.
You'll see a lot of output and debug info. The important bit we are looking for has a ASCII box surrounding it. It will tell you what the public URL for your tunnel is.

Let's go ahead and copy that URL and try it out in the browser. You will probably get a message saying that the request has been blocked and that we need to update the config. Back in the root of the web project create a file called vite.config.js and add the following. Make sure to substitute your Cloudflare URL.
import { defineConfig } from 'vite'

export default defineConfig({
    server: {
        allowedHosts: ["tools-carl-exclusively-thank.trycloudflare.com"]
    }
})
You will need to restart the Vite dev server. In that terminal, use control + C to kill that process and simply run npm run dev again. Now if you visit your tunnel URL, the game should load just as it did on the localhost URL.
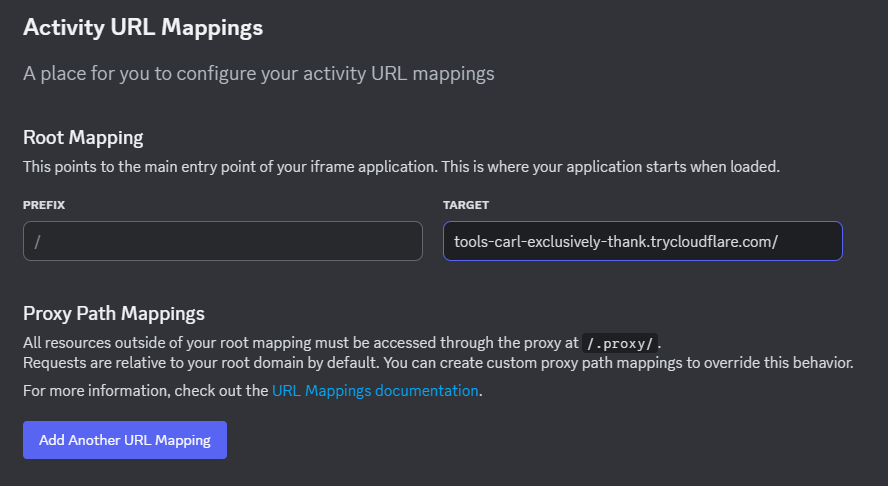
Before we can view our app in Discord, we'll need to tell it where it can find our app. Back in the Discord development panel, inside our activity's config, look towards the bottom of the left hand menu for a menu item that says URL Mappings. Click that and on the screen that follows, paste in your tunnel URL under root mapping. Make sure to remember to save the changes.
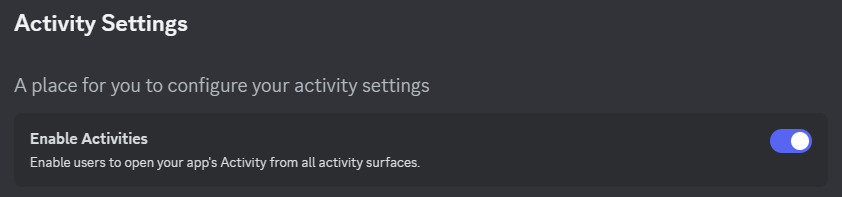
Next go to the Settings tab, under Activities header in that lefthand menu. There you'll see an option to Enable Activities. Lets toggle that on.
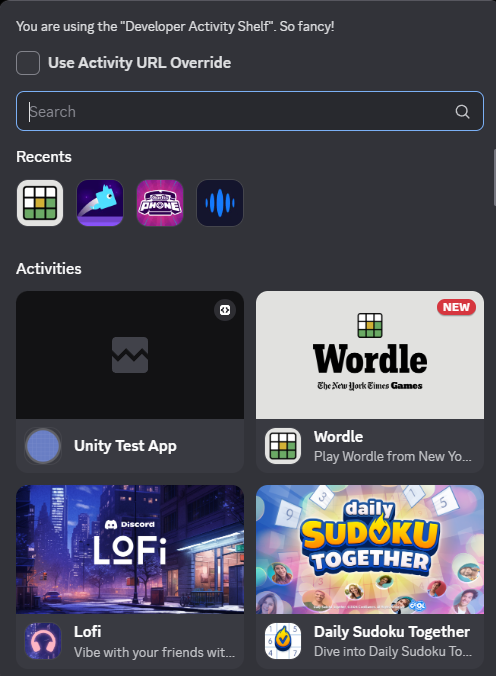
Now lets head to Discord to test things out. Open the Discord client in a browser window. Make sure to refresh the tab if you already had it open. Enter a voice channel and click the Choose Activity button.
Important Note: Until an activity has gone through a verification process, it can't be installed in servers with more than 25 users. You can make a private personal server for development if needed.
You should now see your activity listed at the top of the shelf.


Launching the Activity in Discord
Ok, we got the loading screen, but it doesn't load. Lets check the console in the developer tools to see what's going on.
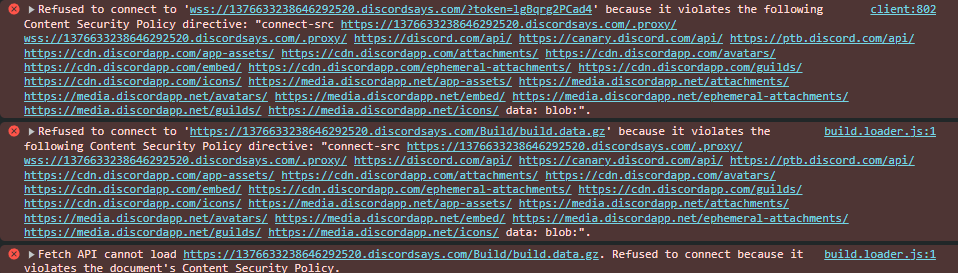
The Discord sandbox has very strict content security policies. What we see happening here is your web app code is trying to load the Unity code and asset bundles and those files are being blocked by these security policies. Though it's not readily apparent what you need to do here, it is fortunately very easy to fix.
Go ahead and exit the activity in discord.
Head back to our main.js in our web app, and lets make one little change. In the line where you specify the build URL, change it as follows:
// This URL won't work
// var buildUrl = "Build";

// We need to tell it to use the proxy path
var buildUrl = "/.proxy/Build";
Now head back to Discord and renter your activity. And huzzah! There's your game running right in Discord!
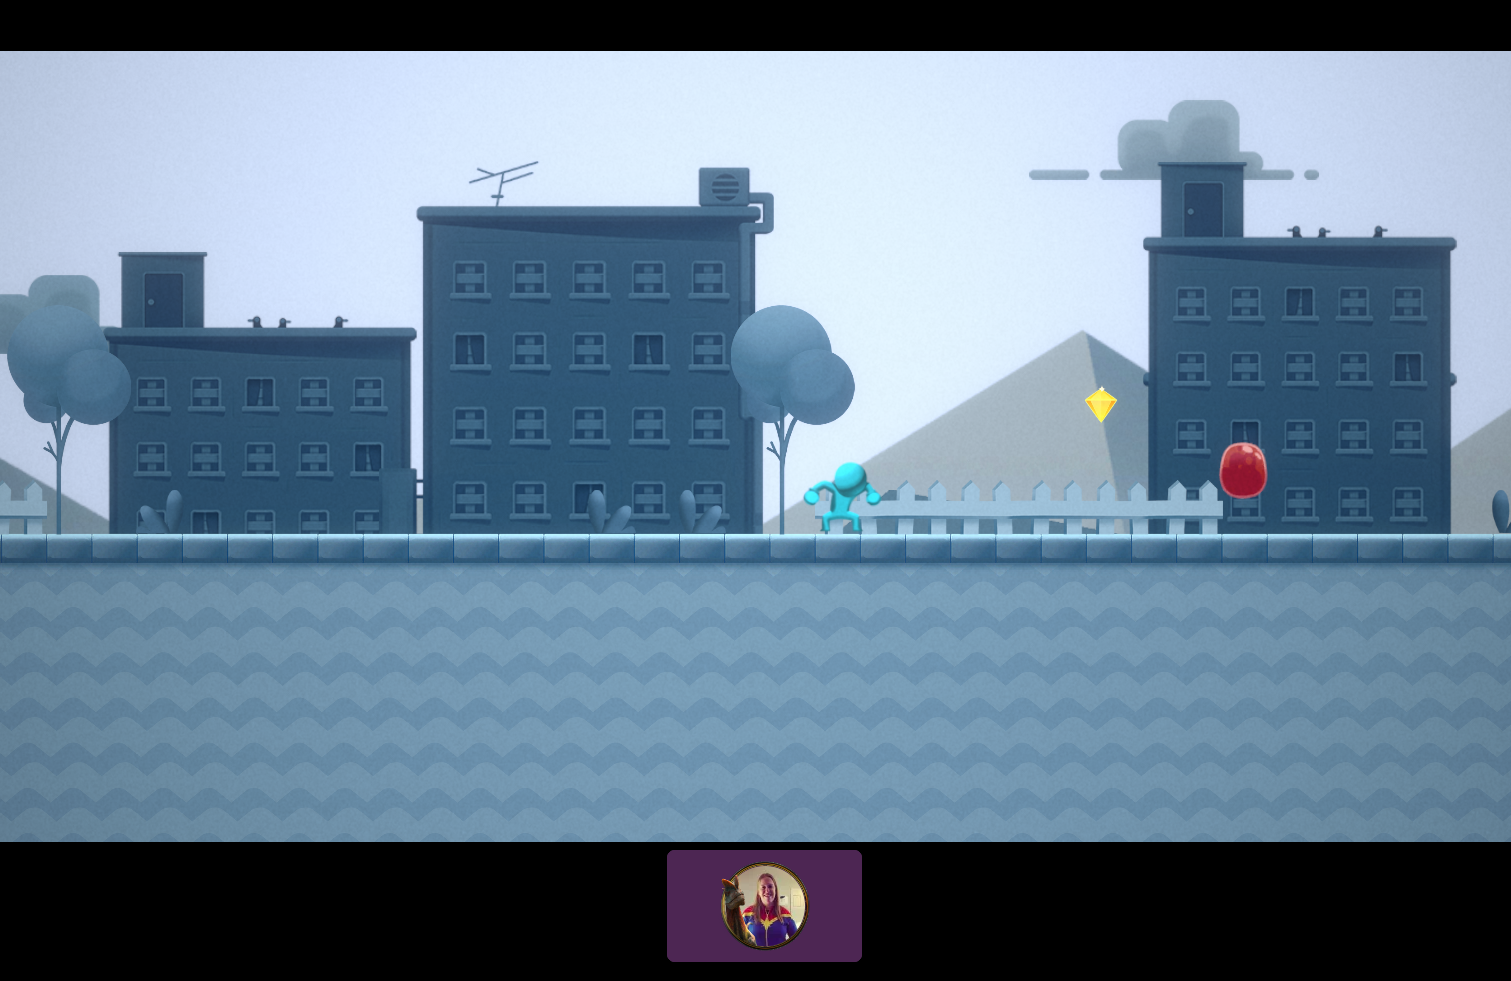
Congratulations! You've set up your first Unity project to run as a Discord Activity.
Enabling the Discord Embedded SDK
Discord is a social platform, and chances are you are going to want to use some of those features. Lets go ahead and add some very basic Discord SDK integration into our project. Exit the activity and head back to our main.js in our web app.
At the top of the script, just after the style import, add the following lines.
import { DiscordSDK } from "@discord/embedded-app-sdk";

// This gets our activity ID from the .env file we created earlier.
const discordSdk = new DiscordSDK(import.meta.env.VITE_DISCORD_CLIENT_ID);
After the unityShowBanner function, add the following function.
async function setupDiscordSdk(){

  await discordSdk.ready();

  // Authorize with Discord Client
  const { code } = await discordSdk.commands.authorize({
    client_id: import.meta.env.VITE_DISCORD_CLIENT_ID,
    response_type: "code",
    state: "",
    prompt: "none",
    scope: [
      "identify",
      "guilds",
      "guilds.members.read"
    ],
  });

   // Retrieve an access_token from your application's server
  const response = await fetch('/.proxy/api/token', {
    method: 'POST',
    headers: {
      'Content-Type': 'application/json',
    },
    body: JSON.stringify({
      code,
    }),
  });
  const {access_token} = await response.json();

  // Authenticate with Discord client (using the access_token)
  auth = await discordSdk.commands.authenticate({
    access_token,
  });
}
This function simply prompts the Discord user for permission to access their identity. You could then, for instance, use this information to identify them in a multiplayer experience.
Finally, in the script.onLoad block, we'll need to call the discord setup function.
script.onload = () => {
createUnityInstance(canvas, config, (progress) => {
document.querySelector("#unity-progress-bar-full").style.width = 100 * progress + "%";
}).then(async (unityInstance) => { // Add the async modifier here
document.querySelector("#unity-loading-bar").style.display = "none";
// Setup Discord SDK Connection
await setupDiscordSdk();
}).catch((message) => {
alert(message);
});
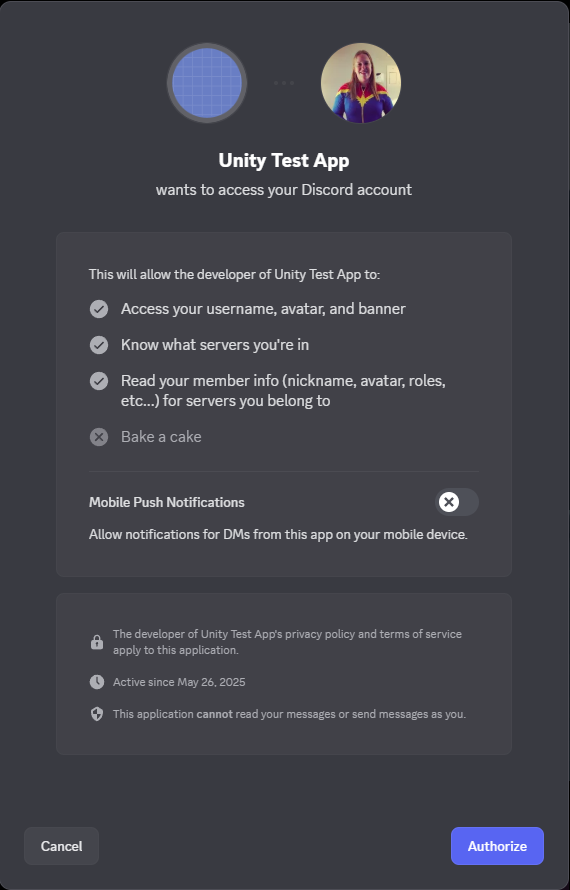
};If you head back to discord and reenter your activity, you will now see a modal asking for permission to share your information with the activity.
The user data can then be used to personalize the in-game experience, set up multiplayer, etc. Those topics are out of the scope of this tutorial.
From Development to Production
This tutorial has taken you through the steps to set up the activity for local development. To move to production, you'll need to host your webapp live on a public URL. Make sure to update the root mapping URL in the activity settings to reflect it's permanent location.
You might also take this step during the development stage of your app. For instance a deploy pipeline or some other such mechanism.
You will also likely need to get the app verified before it can be used publicly across Discord. See the App Verification tab in the Discord development dashboard.

Next Steps
You can find all the code from this project on my Github here: https://github.com/supertorio/Unity-Discord-Example
Like most things in the tech world, there are many different ways to accomplish something like this. If you prefer to build in React or Vue, there are libraries for working with unity web builds.
- Unity WebGL has a Vue Setup - https://github.com/Marinerer/unity-webgl
- React Unity has a variety of libraries for working with Unity WebGL Builds - https://github.com/ReactUnity
You can also communicate with the Discord API directly from within unity.
- Discord's Docs - https://discord.com/developers/docs/discord-social-sdk/getting-started/using-unity
- Dissonity is a Unity SDK, which is described as a C# version of the Discord SDK - https://github.com/Furnyr/Dissonity
There are also third party tools that are designed to make the process of setting up Discord Activities even easier.
- Robo.js has a Unity WebGL template - https://robojs.dev/templates/discord-activities/unity
Go forth and create friends. And if this was helpful, or you make something really cool, please let me know!!